
Pythonic 生成图像。根据一张图片生成类似图片,基于 ControlNet https://github.com/brycedrennan/imaginAIry

 天问
661d9c7478
Update 'README.md'
天问
661d9c7478
Update 'README.md'
|
3 years ago | |
|---|---|---|
| BaiduHi_2023-5-8_15-7-33.jpg | 3 years ago | |
| README.md | 3 years ago |
README.md
imaginAIry
Pythonic 生成图像。根据一张图片生成类似图片
"just works" on Linux and macOS(M1) (and maybe windows?).
# on macOS, make sure rust is installed first
>> pip install imaginairy
>> imagine "a scenic landscape" "a photo of a dog" "photo of a fruit bowl" "portrait photo of a freckled woman" "a bluejay"
# Make an animation showing the generation process
>> imagine --gif "a flower"
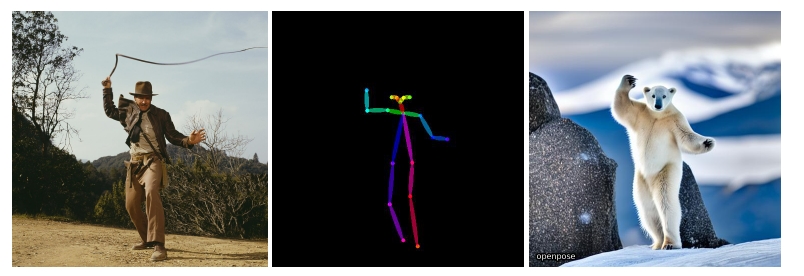
Image Structure Control by ControlNet
Generate images guided by body poses, depth maps, canny edges, hed boundaries, or normal maps.
Openpose Control
imagine --control-image assets/indiana.jpg --control-mode openpose --caption-text openpose "photo of a polar bear"


Canny Edge Control
imagine --control-image assets/lena.png --control-mode canny "photo of a woman with a hat looking at the camera"


HED Boundary Control
imagine --control-image dog.jpg --control-mode hed "photo of a dalmation"


Depth Map Control
imagine --control-image fancy-living.jpg --control-mode depth "a modern living room"


Normal Map Control
imagine --control-image bird.jpg --control-mode normal "a bird"


Image Shuffle Control
Generates the image based on elements of the control image. Kind of similar to style transfer.
imagine --control-image pearl-girl.jpg --control-mode shuffle "a clown"
The middle image is the "shuffled" input image
<img src="assets/girl_with_a_pearl_earring.jpg" height="256">
<img src="assets/pearl_shuffle_019331_1_kdpmpp2m15_PS7.5_img2img-0.0_a_clown.jpg" height="256">
<img src="assets/pearl_shuffle_clown_019331_1_kdpmpp2m15_PS7.5_img2img-0.0_a_clown.jpg" height="256">
Editing Instructions Control
Similar to instructPix2Pix (below) but works with any SD 1.5 based model.
imagine --control-image pearl-girl.jpg --control-mode edit --init-image-strength 0.01 --steps 30 --negative-prompt "" --model openjourney-v2 "make it anime" "make it at the beach"


Add Details Control (upscaling/super-resolution)
Replaces existing details in an image. Good to use with --init-image-strength 0.2
imagine --control-image "assets/wishbone.jpg" --control-mode tile "sharp focus, high-resolution" --init-image-strength 0.2 --steps 30 -w 2048 -h 2048


Instruction based image edits by InstructPix2Pix
Just tell imaginairy how to edit the image and it will do it for you!


Click to see shell commands
Use prompt strength to control how strong the edit is. For extra control you can combine with prompt-based masking. ```bash # enter imaginairy shell >> aimg 🤖🧠> edit scenic_landscape.jpg -p "make it winter" --prompt-strength 20 🤖🧠> edit dog.jpg -p "make the dog red" --prompt-strength 5 🤖🧠> edit bowl_of_fruit.jpg -p "replace the fruit with strawberries" 🤖🧠> edit freckled_woman.jpg -p "make her a cyborg" --prompt-strength 13 🤖🧠> edit bluebird.jpg -p "make the bird wear a cowboy hat" --prompt-strength 10 🤖🧠> edit flower.jpg -p "make the flower out of paper origami" --arg-schedule prompt-strength[1:11:0.3] --steps 25 --compilation-anim gif # create a comparison gif 🤖🧠> edit pearl_girl.jpg -p "make her wear clown makeup" --compare-gif # create an animation showing the edit with increasing prompt strengths 🤖🧠> edit mona-lisa.jpg -p "make it a color professional photo headshot" --negative-prompt "old, ugly, blurry" --arg-schedule "prompt-strength[2:8:0.5]" --compilation-anim gif 🤖🧠> edit gg-bridge.jpg -p "make it night time" --prompt-strength 15 --steps 30 --arg-schedule prompt-strength[1:15:1] --compilation-anim gif ```Quick Image Edit Demo
Want just quickly have some fun? Try edit-demo to apply some pre-defined edits.
>> aimg edit-demo pearl_girl.jpg


Prompt Based Masking by clipseg
Specify advanced text based masks using boolean logic and strength modifiers. Mask syntax:
- mask descriptions must be lowercase
- keywords (
AND,OR,NOT) must be uppercase - parentheses are supported
- mask modifiers may be appended to any mask or group of masks. Example:
(dog OR cat){+5}means that we'll select any dog or cat and then expand the size of the mask area by 5 pixels. Valid mask modifiers:{+n}- expand mask by n pixels{-n}- shrink mask by n pixels{*n}- multiply mask strength. will expand mask to areas that weakly matched the mask description{/n}- divide mask strength. will reduce mask to areas that most strongly matched the mask description. probably not useful
When writing strength modifiers keep in mind that pixel values are between 0 and 1.
>> imagine \
    --init-image pearl_earring.jpg \
    --mask-prompt "face AND NOT (bandana OR hair OR blue fabric){*6}" \
    --mask-mode keep \
    --init-image-strength .2 \
    --fix-faces \
    "a modern female president" "a female robot" "a female doctor" "a female firefighter"
 ➡️
➡️


>> imagine \
    --init-image fruit-bowl.jpg \
    --mask-prompt "fruit OR fruit stem{*6}" \
    --mask-mode replace \
    --mask-modify-original \
    --init-image-strength .1 \
    "a bowl of kittens" "a bowl of gold coins" "a bowl of popcorn" "a bowl of spaghetti"
 ➡️
➡️


Face Enhancement by CodeFormer
>> imagine "a couple smiling" --steps 40 --seed 1 --fix-faces
 ➡️
➡️

Upscaling by RealESRGAN
>> imagine "colorful smoke" --steps 40 --upscale
# upscale an existing image
>> aimg upscale my-image.jpg
Python Example
```python from imaginairy.enhancers.upscale_realesrgan import upscale_image from PIL import Image img = Image.open("my-image.jpg") big_img = upscale_image(i) ``` ➡️
➡️
 ### Tiled Images
```bash
>> imagine "gold coins" "a lush forest" "piles of old books" leaves --tile
```
### Tiled Images
```bash
>> imagine "gold coins" "a lush forest" "piles of old books" leaves --tile
```


 #### 360 degree images
```bash
imagine --tile-x -w 1024 -h 512 "360 degree equirectangular panorama photograph of the desert" --upscale
```
#### 360 degree images
```bash
imagine --tile-x -w 1024 -h 512 "360 degree equirectangular panorama photograph of the desert" --upscale
```
 ### Image-to-Image
Use depth maps for amazing "translations" of existing images.
```bash
>> imagine --model SD-2.0-depth --init-image girl_with_a_pearl_earring_large.jpg --init-image-strength 0.05 "professional headshot photo of a woman with a pearl earring" -r 4 -w 1024 -h 1024 --steps 50
```
### Image-to-Image
Use depth maps for amazing "translations" of existing images.
```bash
>> imagine --model SD-2.0-depth --init-image girl_with_a_pearl_earring_large.jpg --init-image-strength 0.05 "professional headshot photo of a woman with a pearl earring" -r 4 -w 1024 -h 1024 --steps 50
```
 ➡️
➡️


➡️
 ### Work with different generation models


Click to see shell command
```bash imagine "valley, fairytale treehouse village covered, , matte painting, highly detailed, dynamic lighting, cinematic, realism, realistic, photo real, sunset, detailed, high contrast, denoised, centered, michael whelan" --steps 60 --seed 1 --arg-schedule model[sd14,sd15,sd20,sd21,openjourney-v1,openjourney-v2] --arg-schedule "caption-text[sd14,sd15,sd20,sd21,openjourney-v1,openjourney-v2]" ```Prompt Expansion
You can use {} to randomly pull values from lists. A list of values separated by |
and enclosed in { } will be randomly drawn from in a non-repeating fashion. Values that are surrounded by _ _ will
pull from a phrase list of the same name. Folders containing .txt phraselist files may be specified via
--prompt_library_path. The option may be specified multiple times. Built-in categories:
  3d-term, adj-architecture, adj-beauty, adj-detailed, adj-emotion, adj-general, adj-horror, animal, art-scene, art-movement,
  art-site, artist, artist-botanical, artist-surreal, aspect-ratio, bird, body-of-water, body-pose, camera-brand,
  camera-model, color, cosmic-galaxy, cosmic-nebula, cosmic-star, cosmic-term, desktop-background, dinosaur, eyecolor, f-stop,
  fantasy-creature, fantasy-setting, fish, flower, focal-length, food, fruit, games, gen-modifier, hair, hd,
  iso-stop, landscape-type, national-park, nationality, neg-weight, noun-beauty, noun-fantasy, noun-general,
  noun-horror, occupation, painting-style, photo-term, pop-culture, pop-location, punk-style, quantity, rpg-item, scenario-desc,
  skin-color, spaceship, style, tree-species, trippy, world-heritage-site
Examples:
imagine "a {lime|blue|silver|aqua} colored dog" -r 4 --seed 0 (note that it generates a dog of each color without repetition)


imagine "a {_color_} dog" -r 4 --seed 0 will generate four, different colored dogs. The colors will be pulled from an included
phraselist of colors.
imagine "a {_spaceship_|_fruit_|hot air balloon}. low-poly" -r 4 --seed 0 will generate images of spaceships or fruits or a hot air balloon
Python example
```python from imaginairy.enhancers.prompt_expansion import expand_prompts my_prompt = "a giant {_animal_}" expanded_prompts = expand_prompts(n=10, prompt_text=my_prompt, prompt_library_paths=["./prompts"]) ```Credit to noodle-soup-prompts where most, but not all, of the wordlists originate.
Generate image captions (via BLIP)
>> aimg describe assets/mask_examples/bowl001.jpg
a bowl full of gold bars sitting on a table
Example Use Cases
>> aimg
# Generate endless 8k art
🤖🧠> imagine -w 1920 -h 1080 --upscale "{_art-scene_}. {_painting-style_} by {_artist_}" -r 1000 --steps 30 --model sd21v

# generate endless desktop backgrounds
🤖🧠> imagine --tile "{_desktop-background_}" -r 100

# convert a folder of images to pencil sketches
🤖🧠> edit other/images/*.jpg -p "make it a pencil sketch"

# upscale a folder of images
🤖🧠> upscale my-images/*.jpg

# generate kitchen remodel ideas
🤖🧠> imagine --control-image kitchen.jpg -w 1024 -h 1024 "{_interior-style_} kitchen" --control-mode depth -r 100 --init-image 0.01 --upscale --steps 35 --caption-text "{prompt}"
Additional Features
- Generate images either in code or from command line.
- It just works. Proper requirements are installed. Model weights are automatically downloaded. No huggingface account needed. (if you have the right hardware... and aren't on windows)
- Noisy logs are gone (which was surprisingly hard to accomplish)
- WeightedPrompts let you smash together separate prompts (cat-dog)
- Prompt metadata saved into image file metadata
- Have AI generate captions for images
aimg describe <filename-or-url> - Interactive prompt: just run
aimg - finetune your own image model. kind of like dreambooth. Read instructions on "Concept Training" page
How To
For full command line instructions run aimg --help
from imaginairy import imagine, imagine_image_files, ImaginePrompt, WeightedPrompt, LazyLoadingImage

url = "https://upload.wikimedia.org/wikipedia/commons/thumb/6/6c/Thomas_Cole_-_Architect%E2%80%99s_Dream_-_Google_Art_Project.jpg/540px-Thomas_Cole_-_Architect%E2%80%99s_Dream_-_Google_Art_Project.jpg"
prompts = [
    ImaginePrompt("a scenic landscape", seed=1, upscale=True),
    ImaginePrompt("a bowl of fruit"),
    ImaginePrompt([
        WeightedPrompt("cat", weight=1),
        WeightedPrompt("dog", weight=1),
    ]),
    ImaginePrompt(
        "a spacious building",
        init_image=LazyLoadingImage(url=url)
    ),
    ImaginePrompt(
        "a bowl of strawberries",
        init_image=LazyLoadingImage(filepath="mypath/to/bowl_of_fruit.jpg"),
        mask_prompt="fruit OR stem{*2}",  # amplify the stem mask x2
        mask_mode="replace",
        mask_modify_original=True,
    ),
    ImaginePrompt("strawberries", tile_mode=True),
]
for result in imagine(prompts):
    # do something
    result.save("my_image.jpg")

# or

imagine_image_files(prompts, outdir="./my-art")
Requirements
- ~10 gb space for models to download
- A CUDA supported graphics card with >= 11gb VRAM (and CUDA installed) or an M1 processor.
- Python installed. Preferably Python 3.10. (not conda)
- For macOS rust and setuptools-rust must be installed to compile the
tokenizerlibrary. They can be installed via:curl --proto '=https' --tlsv1.2 -sSf https://sh.rustup.rs | shandpip install setuptools-rust
Running in Docker
See example Dockerfile (works on machine where you can pass the gpu into the container)
docker build . -t imaginairy
# you really want to map the cache or you end up wasting a lot of time and space redownloading the model weights
docker run -it --gpus all -v $HOME/.cache/huggingface:/root/.cache/huggingface -v $HOME/.cache/torch:/root/.cache/torch -v `pwd`/outputs:/outputs imaginairy /bin/bash
Running on Google Colab
Q&A
Q: How do I change the cache directory for where models are stored?
A: Set the HUGGINGFACE_HUB_CACHE environment variable.
Q: How do I free up disk space?
A: The AI models are cached in ~/.cache/ (or HUGGINGFACE_HUB_CACHE). To delete the cache remove the following folders:
- ~/.cache/imaginairy
- ~/.cache/clip
- ~/.cache/torch
- ~/.cache/huggingface
Not Supported
- a GUI. this is a python library
- exploratory features that don't work well